
Do you struggle with creating bespoke onboarding experiences?
Do you find it hard to learn how to give clarity, or get your client to take action?
Maybe you have a fear of messing everything up or not knowing what comes first and not having a structured sales process?
What would it be like if you had a consistent, personalised system for onboarding new clients on autopilot?
Client onboarding is something we all do as business owners in the B2B space, but there are a lot of problems that arise during the process. By having a clear onboarding process, you can demolish the fear of losing clients and do a little bit of work for a LOT of reward, which is exactly what we will discuss in this article.
3 Steps to Level Up Your Onboarding
There are four fundamental ingredients that go into a B2B client onboarding funnel; payment, onboarding checklist, onboarding call, and an email sequence. We develop these ingredients through a series of steps.
Step 1- Initiate
Have an onboarding call. This is where we will kick-off the client relationship the right way by getting everything out on the table to set you and your client up for a successful relationship.
Firstly, you need to give your meeting a name. We call this an AWP (Appointment With Purpose), where we give the meeting a purposeful name that is outcome focused. By giving your meeting a name such as ’35 Minute B2B Onboarding Call’, your call becomes a ‘thing’ and not just a vague call.
Secondly, you need to tell your client what the outcome will be of the call. The meeting has a name, it has set outcomes, and therefore a PURPOSE! Lastly, tell your client how the call is going to work. They need to know the structure, agenda, call length, and what will happen after the call.
Step 2- The Intel
There needs to be an onboarding checklist. In this checklist, there are 3 integral questions that you should be asking your client in order to gain information from them that can benefit you.
Why did they buy?
It may seem trivial to ask this, but if you don’t know exactly why your clients are buying from you, how are you supposed to know how to improve your sales conversations, marketing communications, or objection handling in the future?
What almost stopped them from buying from you?
Many purchases come from a last minute decision, or a decision that was heavily debated on prior to the purchase. Asking your clients “What almost stopped you?”, is another crucial question for figuring out how you can improve your business communications in future, or even diagnosing underlying issues in your sales processes.
Fast Forward questions
If you can find out what your client wants from you down the line- 3 months, 6 months, 12 months, even 2 years from now, you will know exactly what your client is expecting from you, before you have even begun to work with them.
Step 3- Indoctrinate
The Welcome Email
As soon as your client has filled in their onboarding checklist, you want to send them their welcome email. This will give them an idea of what the relationship and project will be like and how the product will unfold. This will also allow you to let your client know what could go wrong in the process, and ensure there are no surprises. You can educate your client in a welcome email by including things like bullet-points, a video at the top of your checklist, blog articles or even more lead magnets.
Case Studies
It may feel like you’re boasting about your business, but incorporating case studies into your email sequence is an important step. You can show your client what it’s like to work in your funnel by showing how you’ve helped other people. This creates excitement and anticipation, because you’re showing them what the possibilities are.
Book the Call
It’s very likely that you will need to remind your client to book their call. People get distracted, Don’t see a time that suits, or procrastinate, so you may need to bring people back into your funnel by reminding them to book. You can do this by sending email reminders with working like “Go back if you haven’t already!”
HOT TIP: If you’re still raising invoices by email and spending large amounts of time chasing those invoices up and having back and forth communications with clients, streamline this process with a cart page.
A cart page allows you to get paid up-front and means that you can hold off working with a client until they have paid you (or at least put down a deposit.) It’s important to wait until you’ve been paid to start working with someone, because a payment signals a commitment, showing that your client has both feet in the door and they’re ready to work with you.
ACTION: Use a tool like B2B Dash to automate your invoice process with a cart page and future forecast your income. By systemising your payment process, you can then spend your extra time making more sales! It’s future pacing, it relieves stress, and allows payments up front. Rather than chasing up invoices back and forth, you can go to sleep after sending a cart page link and wake up the next morning with money in the bank. If you want to start building your cart page with B2B Dash, click here.
How to Create a Booking Page and Checklist
Starting with the booking, give it a purposeful name, colour and picture. Tell your client what the outcomes are going to be. After that, set up availability slots to pick a date and time. It only takes around 5-10 minutes to create a fully functioning booking page with B2B Dash.
Then you create the onboarding checklist. This could include a layer of personalisation by showing a short video at the top of the page as a welcome, a banner created in a graphic creation tool such as Canva, or just a headline above your list of questions.
Your checklist questions eliminate the time spent communicating back and forth with your client, instead allowing you to ask questions in order to get the answers you need right from the start. When it comes to crafting the questions, decide on what it is that you need to know from the client. For example, someone in a creative industry might need logins or url’s of websites and portfolios.
![]()
How we do it at B2B Dash and B2B School
First we create the booking page, then the checklist, and lastly the cart page. The booking page is where the client will select a time to speak with you. The three ingredients we incorporate into our booking pages are a purposeful name, the outcomes of the meeting, and the ‘how’- how we will help the client. When the booking page is created, it will provide you with a url. The booking page needs to be created first because in the next stage, your checklists will redirect to the booking page.
The checklist page should include questions that will help you understand the client better, and this page will redirect to the booking page after completion. In our checklist we ask questions about our clients’ industries, interests, and focuses, because this allows us to categorise them into buckets. We also like to ask a ‘champagne question’, like this: “In 6 months from now, you’ll want to be thinking ‘Wow I’ve crushed it.’ How will you be measuring your success?” Or, “In 3 or 6 months time, how will you know that this product/program was good value?”
This will give you all the reasons they are working with you and why they think you are valuable. You can also use your checklist questions to manage expectations by asking questions like: “Tell me all of the things you’d love to do together.” “Now, what do you feel is more realistic in the next 90 days.” Questions like this will help your client scale back, set realistic goals, and align their expectations with yours.
Some of the most important questions we ask are:
“What was the main reason you decided to invest in our products or program, and what outcomes are you seeking?”
This question allows you to understand their current mindset, as well as identify how you can help them.
 “What was the main moment during the sales process that you were sold? What got you across the line?”
This allows you to see which of your tactics are working and are effective, that you can then use to improve your practises in the future.
“What was the one fear or anxiety that almost stopped you from signing up? Did you pause? What almost stopped you?”
This shows you what may not be working in your sales process and also gives fantastic insight into handling objections. You can then incorporate these objections into future marketing, like this: “I know what you’re thinking, you fear this… and that’s why we offer this…”
If you’re looking for more examples of questions to include in your checklist, keep an eye out for our upcoming blog post dedicated to checklist questions.
Finally, the cart page is created. This page can then redirect to the checklist, which will then lead to the booking page.The cart page doesn’t need to be professionally designed, but it’s incredibly easy to create a professional-looking cart page in B2B Dash. The three things we incorporate into our cart pages are a logo, dot-point information, and a testimonial. Remember, when it comes to testimonials we use the ‘1, 5 or none’ rule. You can read more about that rule in our Perfect Proposals blog post, here.
HOT TIP: You can incorporate a money back guarantee (MBG) into your cart page to de-risk your offer further. If you want to learn more about de-risking your offer, check out the Perfect Proposals blog article we wrote last week, here!
How to Create Your Email Sequence
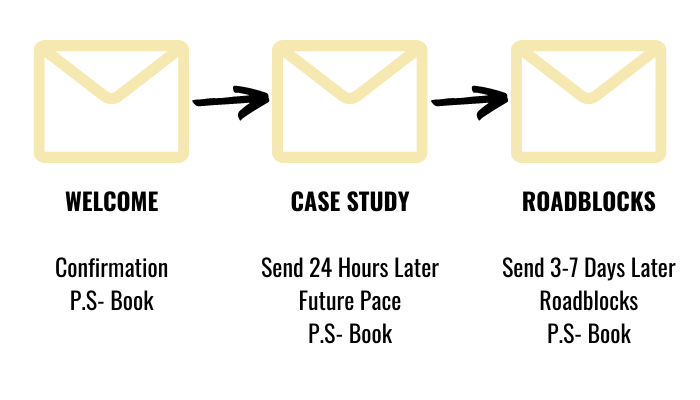
A welcome email is something that needs to trigger as soon as someone completes the onboarding form. We like to describe the perfect email sequence as a set of three emails.
The First Email
Your first email is a welcome. It confirms that this is happening! This email can also include things that the client can do to help the relationship go smoothly.
LINES TO HELP YOU GET STARTED: “Welcome to our community. Thank you for your trust, here are a couple of things we wanted to tell you that will help make the project to go smoothly. Here’s what I’ll need from you next…”
The Second Email
This email should include case studies. It might feel weird to toot your own horn, or you might be asking: “Why do I need a case study when they’ve just spent the money?”
Yes, the client has paid, but now we want to excite them to put in the effort. This email should be sent 24 hours after the welcome email in order to harness the fresh excitement your client has to work with you.
LINES TO HELP YOU GET STARTED: “Hey! We know you’re excited to work with us, check out what we’ve created with other clients… Here’s a case study we wanted to share with you…”
The Third Email
The third email can go one of two ways. The first is addressing the things that could potentially go wrong. The second is addressing the things that they should do to ensure everything goes right.
Let’s start with the negatives. You can address the negative stuff, but it can be done in a positive way by using headlines such as: “Here are a couple of ways projects can go off the rails. Lets work together and make a commitment to not let that happen.” If you’re describing a roadblock that drives you absolutely crazy when you’re working with clients, write about it using this ‘negative’ strategy.
The flip-side is the positive route. If you want your roadblock to sound aspirational, use this strategy. A ‘positive’ email can be written using this analogy as a base: ‘Before you go hiking, you need to fill your backpack. Here’s what you’ll need before you go!’
If you’re struggling to decide whether to take the positive or negative route when it comes to crafting the third email, consider the situation and attitude of your client throughout the process so far. The third email will come 3-7 days later than the second one, so if you feel like your client is needing a push, the negative route may be more effective. If you are feeling confident that your client is on top of everything, then the positive route can be a great way to set up their next steps.
HOT TIP: If you are planning on using the positive route in the third email, you can also incorporate these positive points in your welcome email.
BONUS HOT TIP: Add a P.S in all of the emails to encourage your client to book a call, like this: “If you haven’t done so yet, book your meeting by clicking here”
If you’re feeling overwhelmed by the process of onboarding, don’t be! You don’t need to do all of these things at once, just take it in small bites by starting with your booking, then getting into a checklist, and then the email sequence. Create the call, then the checklist, the cart, and finally your emails to fill in all of the gaps.
The process of automating payments may be daunting, but it’s something that will save you hours of time in your sales process, as well as relieving the stress. It feels great once you get to the end of the sales call, simply direct people straight to a cart page and ask the classic question “Visa or Mastercard”. An automated payment system allows you to get your clients’ card details and enter it all in on the spot without needing to worry about taking the process off the call and into the nightmare of invoices.
If you want help with getting to the pointy end of the deal during calls, our B2B One Call Close Formula™ details the 9 stages to a successful call, including pre-framing, anchor questions, and closing the deal.